TCP/IP Server
This assignment explores various simple application layer protocols and how messages are constructed using lower level protocols like TCP and IP. Students will use packet sniffing software to intercept traffic arriving on their machine and build their own TCP servers using Node.js.
Learning Goals
- Use Wireshark to analyze network traffic
- Understand TCP traffic flow and handshakes
- Understand TCP / IP datagram components
- Understanding the Node.js net package
- Writing a TCP server in Node.js
- Writing a TCP client in Node.js
- Learning about server-side event listeners.
- Introducing streams and sockets
Software Required
These instructions are designed with a Windows OS in mind. They should technically work on Mac, but I cannot provide support if you have software problems.
Npcap
Npcap is a Windows packet sniffing (and sending) library.
- Used to capture network traffic.
- If your using a Mac skip this.
Wireshark (Install Npcap first)
https://www.wireshark.org/#download
Wireshark is a network protocol analyzer.
Npcap only captures traffic, Wireshark adds a visual layer that can give a more in-depth analysis of the captured packets.
Do not install WinPcap (We are using Npcap) or USB debugging (We will not be capturing USB traffic)
If using Mac, install chmodBPF after installing Wireshark (comes with the dmg installer)
- The assignment is designed with Windows in mind, if using different O.S. no support related to software issues is provided.
Netcat via MobaXterm Shell (Home edition)
https://mobaxterm.mobatek.net/download.html
Netcat is a networking utility for reading and writing on network connections using TCP or UDP.
- Generates TCP traffic. Acts as a TCP client for servers we will write in Node.js
- MobaXterm's has a special version of Netcat in its Shell. This version sends a
FINpacket when a connection is closed. - For those using Mac, I don't see why Terminal wouldn't work, but no support is provided. The
nccomand should work.
Sequence Diagramming Tool
sequencediagram.org is a web based sequence diagram creator.
- Click on the fourth icon
[?]to learn the syntax required to create sequence diagrams.
- Click on the fourth icon
PDF Reader capable of Form Filling
- One of the tasks requires you to fill out a pdf. A fillable PDF is included. (Fall 2020 - you do not need to submit this)
Node.js
- TCP Server code will be written in JavaScript. Node.js runtime will execute the code.
Setup
- Create a directory
A03-########to keep all the files created, replacing#with your Student ID. (For Fall 2020 you do not need to submit this, but it helps to keep everything organized) - Start the
Node Command Promptand typenode -vto check the version. Ensure it is at least version 13.10.1 (If not download the latest version from the Node.js website)
Reading
https://nodejs.org/api/net.html
Server Events
connectionlistening
Server Methods
net.createServer()server.listen()
Socket Events
closeconnectdataend
Socket Methods
net.createConnection()socket.connect()socket.write()socket.end()
NIST Daytime Client
We will be walking through the process of sending a DAYTIME request to the server time-a-g.nist.gov and analyzing the traffic generated.
Start Wireshark
There should be two connections that are not flat, choose the one that is not
Loopback Adapter, wired connections should beLocal Area Connection / Ethernet, wireless should beWireless Network Connection.
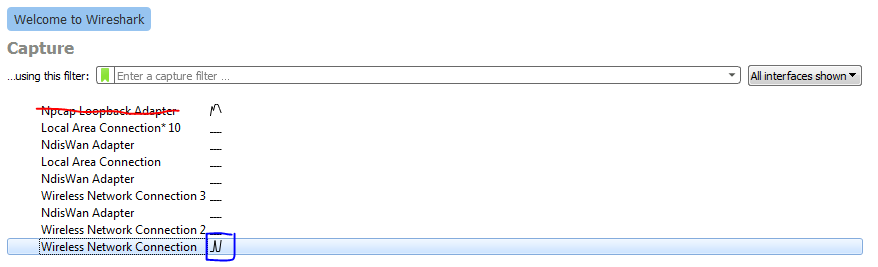
In the top left corner is the "Start capturing packets" button which has a shark icon.
Click it and there will be a swarm of messages, as most computers have substantial background traffic.
Click the stop button.
Click the "Close this capture file" button which has the icon of a paper with an X. Do not save the file. We want to capture certain traffic, but there is noise in other networked applications. We need a mechanism to filter the results.
We will get the Daytime from
time-a-g.nist.gov, a server hosted by NISTOn Wireshark home, click the same connection as before
- Important, click before typing (step 7), but don't double click
- The filter on Wireshark home (capture filter) and the display filter are not the same. You cannot type port 13 into the display filter, you must go back to Wireshark home by clicking
StopandClose Capture File.
Type into the capture filter bar
port 13It should turn green, click on the "Start capturing packets" button. Wireshark will now start capturing any traffic between the local device and the any transmissions on port 13.
We will use Netcat to create traffic.
Start MobaXterm, ClickSession(Leftmost Icon not plural form), ClickShell, ClickOK
In MobaXterm's Shell type in:
xxxxxxxxxxnc time-a-g.nist.gov 13Double check that a date time value is printed, this may take two attempts. If it fails to print the date or you see reset flags jump back to the step "Close the capture file"
If you are still having issues try changing the domain to one of the following instead:
This will call the Netcat application to make a TCP request to the host time-a-g.nist.gov on port 13.
Port 13 is reserved for the Daytime Protocol
https://tools.ietf.org/html/rfc867
Switching back to Wireshark there should be some traffic. Click the stop button to stop capturing. Double check that the traffic has a total of 8 segments and contains a segment with protocol DAYTIME. If not, restart from "Close this capture file" until 8 segments are received. You may also have to redo this step if you see a TCP Reset flag
[RST]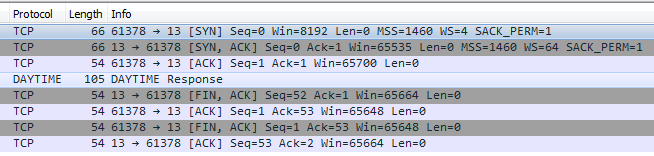
There are 8 TCP segments in total, each one is wrapped with an IP header and an Ethernet frame. Click on the drop down arrow to see the values.
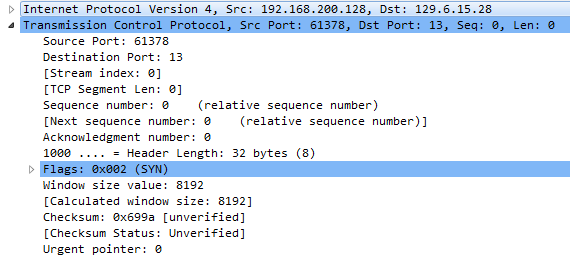
On each Layer click through each component to see where exactly each of the headers are.
The next question tasks you with filling out 8 diagrams with data from WireShark, one for each segment sent (Write on top of each section). The PDF is fillable if you have the right software. [16pt]
- If your computer is running IPv4 (most common) fill out the following diagram
- If your computer is running IPv6 fill out the following diagram
For Sequence and Acknowledgement numbers write the relative value.
Daytime Server
We will be walking through creating a Node.js server that simulates the TCP half of the Daytime Protocol (We skip the UDP portion as mixing TCP and UDP traffic increases the complexity)
Read the Daytime RFC
Create a file
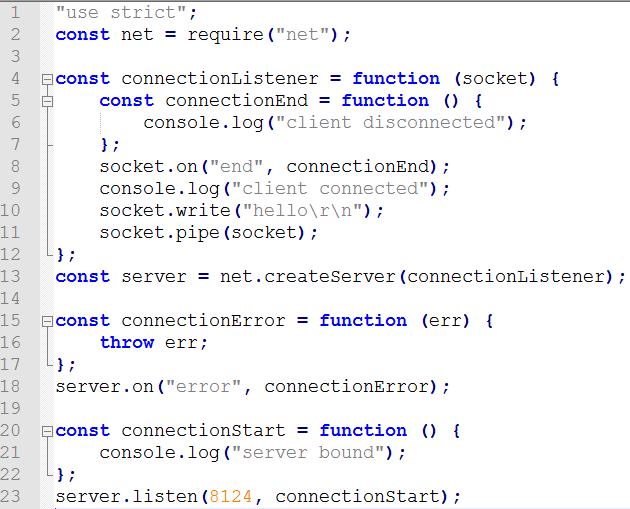
daytime-server.jsin the assignment directory.Start with the code from here:
https://nodejs.org/api/net.html#net_net_createserver_options_connectionlistener
Save the file
Open
Explorerand navigate to the assignment directory, Click the address bar and copy the path.Start the
Node.js Command promptand type incd(Change directory) then paste the copied path.To start the server, type:
xxxxxxxxxxnode daytime-server.jsThe message
server boundshould appear. Leave this terminal open.Type in the following to MobaXterm's Shell
xxxxxxxxxxnc localhost 8124This will send a TCP request to port 8124.
localhostresolves to127.0.0.1which is a reserved IP address, called the local loopback which refers to the local computer.The message
helloshould appear in MobaXterm's Shell, andclient boundin the Node.js terminal.Type your name and press enter into the MobaXterm Shell, the server should reply by repeating back any received message.
Press
CTRL + Cto end the communication. MobaXterm's version ofNetcatsends aFINto the server to end the connection, (not all versions ofNetcatdo this). This lets the connection terminate gracefully and keep the server running.Run netcat again. (Do not terminate
daytime-server.js)Hint: Push up to cycle through previous commands
With the existing shell session still open, in MobaXterm start another Shell session and type in the same command again. On the Node.js end, there should be two
client connectedmessages in a row. This demonstrates the TCP server's ability to handle multiple clients at the same time.Close both connections and kill one of the shells.
Close the
daytime-server.jswithCTRL + CWhenever the server code changes, the existing process needs to be restarted.
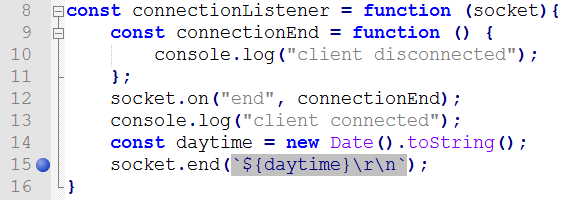
Rewrite the server code into the following:
The functionality should not change, the reason for the rewrite is solely for clarity. The initial code uses language constructs and objects that we may have only covered in limited amounts (arrow functions, connection listeners, and sockets) The original code is cleaner, but also more complexity dense.
The following offers a line by line explanation of the above code
Line 1:
"use strict";Turns on strict mode, turning common mistakes into discoverable errors.https://developer.mozilla.org/en-US/docs/Web/JavaScript/Reference/Strict_mode
Line 2:
netis Node.js's built in TCP library (dgramwould be the equivalent UDP library). Node.js separates its library code into packages which are imported using therequirekeyword. All public methods of this package are then contained inside the newly creatednetobject.Line 13: Create a new TCP server of type
net.Serverusing thenetpackagenet.createServermethod accepts two optional inputsoptions(modifies the server's behavior) andconnectionListener(callback functionthat fires when a new client connects)optionsis truly optional (the default values are what we typically want). The sample code leaves this variable out.connectionListeneris optional, in the sense that without it, the code will not break, but it also does nothing. The sample code assigns a variableconnectionListenerwhich is a function that listens for a"connection"event before running it's function body.https://nodejs.org/api/net.html#net_event_connection
socket- The first input variable ofconnectionListeneris of typenet.Socketand represents the connection thatconnectionListenerresponded to. The variable name is unimportant (in the original code it was calledc) what matters is that the variable is the first argument.
Lines 15-18: Defines a more typical event emitter for errors. Lines 15-17 define what should happen in case of a server failure. Line 18 creates an event listener that listens for a specific event. The list of server events are
["close", "connection", "error", "listening"]https://nodejs.org/api/net.html#net_event_close
We could rewrite the code (but don't) using this listener format and it would behave the the same.
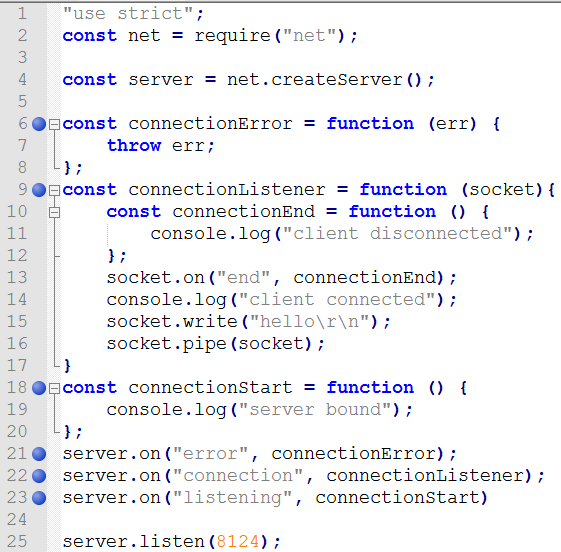
I prefer this style as it's more uniform, but do not rewrite it (yet) as the line numbers would no longer match up making the rest of the instructions confusing.
The reason the code is written the other way, is because the
"connection"event is the most important event for the server and defining it when creating the server is preferred by some.Lines 20-23: Defines an anonymous function that is saved into the variable
connectionStart. When the server starts listening for connections, the function stored inconnectionStartis called. Server's do not start listening until thelistenmethod is called which binds the server to a specific port number; 8124 in this case.Lines 4-12: Defines an anonymous function that is saved into the variable
connectionListener. Whenever a client connects with the server, the function stored inconnectionListeneris fired and all the code inside is executed. (Conversely if no client ever connects, this code never executes)This function has a single input
socketrepresenting the connection that was established.net.Socket
This class is an abstraction of a TCP socket... A
net.Socketis also a duplex stream, so it can be both readable and writable, and it is also anEventEmitter.stream - Streams deal with controlling data flows from various sources. They are useful for data sources that may not have a well defined start and end (like user input).
writable: An abstraction of a data source that is created
readable: An abstraction of a data source that is consumed
readable.pipe(writable)A method of the
readablestream that directs the input (readable) to an output stream (writable)https://nodejs.org/api/stream.html#stream_readable_pipe_destination_options
duplex: both readable and writable at the same time, in a later assignment we will use
httpwhich can better separate request from response.
EventEmitter: individual connections can emit event similar to how the server can emit events. We can set up listeners that fire when events are emitted.
Line 5-7: Function inside of a function. This is allowed in JavaScript, the function stored in variable
connectionEndis scoped to only exist inside theconnectionListenerfunction.Line 8: Binds the function
connectionEndto the socket'sendlistener. When theendevent is emitted from the socketconnectionEndwill execute.
Socket's have 9 events that can be emitted vs. a server's 4.
["close", "connect", "data", "drain", "end", "error", "lookup", "ready", "timeout"]
https://nodejs.org/api/net.html#net_event_close_1
Line 10: Writing to connected client
Line 11: Sockets are duplex, meaning we can read from them as well. This line reads the next input the client sends and directs the input to be sent back on the same stream.
Changing the code to:
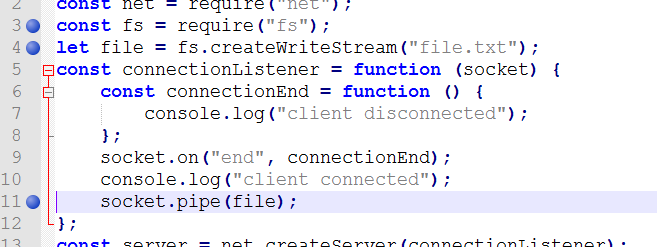
will send the typed message to a file
file.txtChanging the code to:
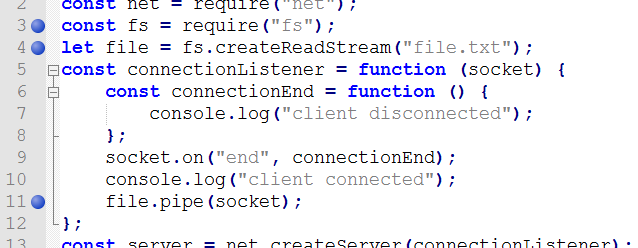
will send the contents of
file.txtto any client that connects.(Yes, the contents of one file can be piped to another)
Change the code to the following:
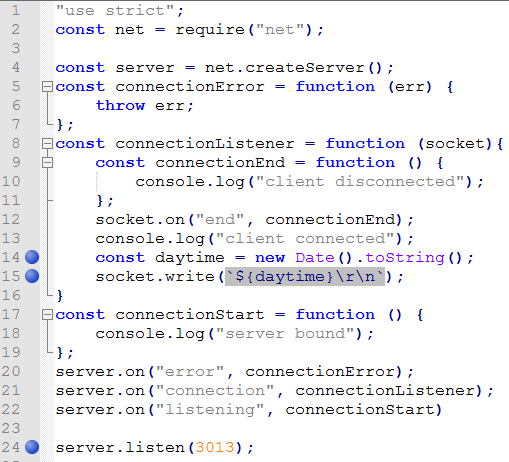
Start the node server.
Start Wireshark, this time use the
Loopback adapter. This allows us to capture loopback traffic (has the same origination and destination).Change the capture filter to
port 3013, start capturing data.In MobaXterm Shell type
nc localhost 3013which will create 5 packets in Wireshark.Press
CTRL + Cto close the connection which will generate the next 4 packets.
Notice that the traffic generated is not identify as a
DATETIMEpacket by WireShark. This is because this example uses port 3013, and not the standard port 13.Side note: I choose port 3013 instead of port 13, because some computers have these test services running and I want to minimize the chance of conflicting with the OS's version of daytime/qotd/echo. In general try to avoid using low numbered ports in the range 1-1023 when writing programs.
Draw the network traffic diagram for these 9 segments. [10pts]
Use https://sequencediagram.org to draw the diagram (The 4th icon
[?]covers the syntax)Example network traffic diagram:
Include relative sequencing numbers/acknowledgement numbers, flags, and payload data/protocol (if available) The sample video does not include all of these.
On the diagram identify the 3-way connection handshake and the 4-way termination handshake
- https://en.wikipedia.org/wiki/Transmission_Control_Protocol#Connection_establishment
- https://en.wikipedia.org/wiki/Transmission_Control_Protocol#Connection_termination
Save it as
daytime-traffic-segments-01.pngSince the machine running the client/server is the same it will have the same IP: to differentiate client from server traffic look at the ports. (One will use a high numbered ephemeral port)
In the previous example the client ended the connection.
Change the code on line 15 to the following:
and capture the traffic again.
Draw the sequence diagram for the traffic of these 9 segments. [5pts]
Save it as
daytime-traffic-segments-02.png
Daytime Client
Next we will write a dedicated client program that will query the server, so that we no longer need to use netcat.
Read up on
net.createConnection()(third signature)Create a new file
daytime-client.jsAdd the following code:
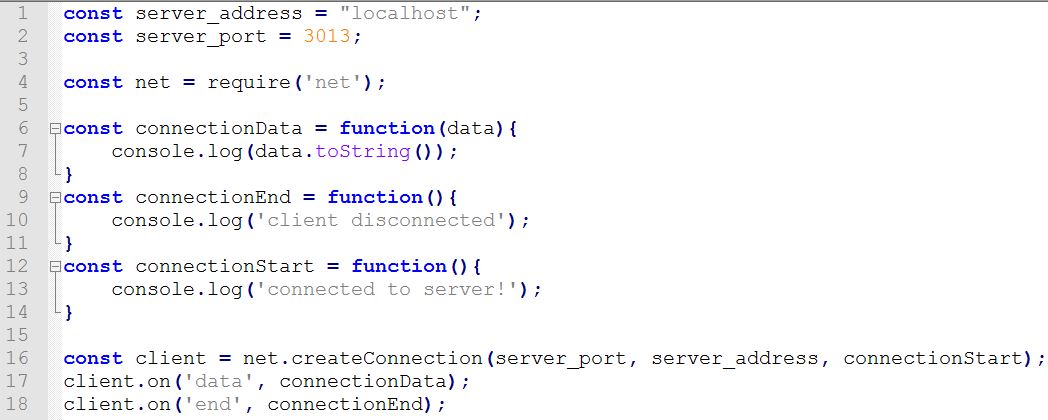
net.createConnection: creates a socketStart a command prompt and start the server
Start a second command prompt and run the client.
In the code change the value for
server_addresstotime-a-g.nist.govandserver_portto13and run it again.Repeat the process one more time, this time using wireshark to capture the data, make sure to listen on port 13. Save the capture file as
daytime-client.pcapng[5pt]
QoTD Server
Write a TCP server according to the following specs: (Students only need to write the TCP server, skip UDP, don't write a client, instead use netcat to test it) Use port 3014.
https://tools.ietf.org/html/rfc865
Save it as qotd-server.js [10pts]
Have at least 7 different quotes that will change each day. You may decide the quotes.
Use Wireshark to capture the traffic. Examine the network traffic, specifically the contents of the payload packet (quote)
Draw the sequence diagram. Save it as qotd-traffic-segments.png [10pts]
echo Server
Write a TCP server according to the following specs: (Students only need to write the TCP server, skip UDP, don't write a client, instead use netcat to test it) Use port 3015.
https://tools.ietf.org/html/rfc862
Save it as echo-server.js [5pts]
Use Wireshark to capture the traffic.
Wireshark will classify the payload packet as generic TCP because the port number is unrecognized.
Generate two echo statements CS355 and your student_id. Then close the connection using CTRL + C.
Draw the sequence diagram. Save it as echo-traffic-segments.png [10pts]
Hint
https://nodejs.org/api/net.html#net_net_createserver_options_connectionlistener
Remember that sockets are bidirectional. Any socket can be both read from and written to.
TCP Chat Server and Client
There will be two files, a server and a client. There will be only one instance of a server, but there can be many clients. All connected clients can send a message to the server which will then be sent to all other clients. [29pts]
Server
Start with a copy of daytime-server.js as a starting template, save it as chat-server.js
The server will need to listen to the following events:
error: Throw an errorlistening: Printserver boundto console.connection: Called when a client connects. Set up three listeners, then adds the socket of the current connection to an array of all connections. Finally addconsole.log(socket.remotePort);to the end of the "connection" event handler to see the unique ports being used by clientsOnce a connection is established the socket will listen to the following events:
end: printclient disconnectedand remove that socket from the connections array.error: samedata: Usesocket.write()to send the data to everyone except the current connection.https://nodejs.org/api/net.html#net_socket_write_data_encoding_callback
Client
Start with a copy of date-time-client.js as a starting template, save it as chat-client.js
Create a variable nickname on top, but don't set it to anything yet.
Add the following code to setup console input.
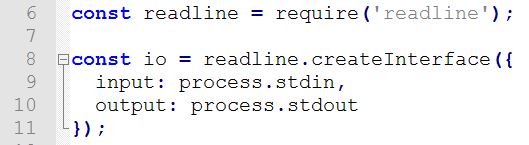
https://nodejs.org/api/readline.html#readline_readline
We will need to implement the same methods, connectionData, connectionEnd, and connectionStart as the client needs to accommodate for these three actions.
connectionStart() will ask the user to choose a nickname and then call a new function chat().
Use the readline.question() method to capture input.
https://nodejs.org/api/readline.html#readline_rl_question_query_callback
chat():
print the users nickname surrounded in braces
Wait for user input
Check if input is the string
/exit, if so usesocket.end()andprocess.exit();to exitxxxxxxxxxxclient.end(function(){process.exit();});clientrepresents the variable name of the socket to be closed, it is not a keyword.https://nodejs.org/api/net.html#net_socket_end_data_encoding_callback
Otherwise use
socket.write()to send data to the server to be propagated to all clients, prefix the message with the users nickname in square braces.Call the
chat()function recursively. (Chat messages from the same user should be synchronous).
connectionEnd(): is unchanged, will also print client disconnected
connectionData():
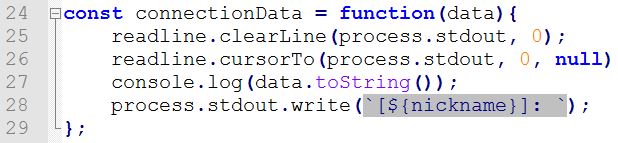
- Line 25 clears the TTY console.
- Line 26 moves the cursor to the beginning of the line.
- Line 27 prints the data received and a newline
- Line 28 Rewrites the erased prompt.
Hints
First try getting the message sent to all connected clients. Then try to exclude the sending client from the recipient socket list.
This chat application should work with different machines if you have friends to test it with, (just plug in their IP address) but it's not necessary to perform this testing.